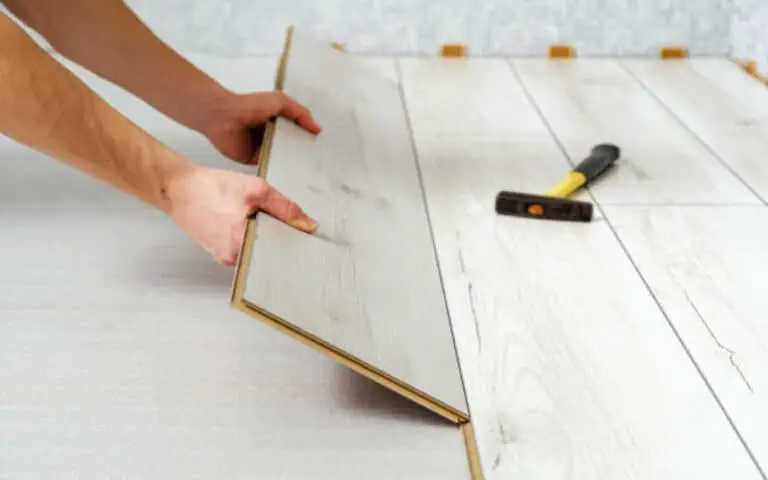
Installing engineered wood flooring is a great way to upgrade your space without breaking the bank. In this blog post, I’ll walk you through the step-by-step process of installing and maintaining engineered wood flooring in your bathroom.
Step 1: Trim the Door Casings
Before installing the engineered wood planks, we must first trim the door casings. This will ensure that the planks fit perfectly and don’t interfere with the door frames. To do this, take a measuring tape and measure the height of your doorframes.
Then, use a saw to cut the casings of your door frames at the same height. Once you have done this, you can start laying down your engineered wood flooring!
Step 2: Secure the First Row
Once you have trimmed the door casings and laid out the first row, it is time to secure the first row of engineered wood flooring. Before starting, mix planks between packages to ensure different shades when installing.
If installing over a wood subfloor, use your nailer to drive fasteners through the groove and into the floor at a 45-degree angle. Additionally, it is important to choose a hardwood species and board width that is appropriate for your room. With these tips, you can securely install your engineered wood flooring!
Step 3: Install the Next Rows
Once the first row is secured, it’s time to install the next rows. This can be done in several ways: glue each plank directly to the subfloor, use a tapping block, or use a floor stapler.
Whichever method you choose, ensure all planks are properly aligned, and the tongue and groove configuration is correctly matched. Using a tapping block, use light taps when connecting the planks, as too much force may cause them to crack.
Finally, ensure that each plank is pushed tightly against the previous one to ensure an even installation level. With these steps in mind, installing the next rows should be a breeze!
Step 4: Measure and Cut Planks
Once you’ve secured the last row, it’s time to start measuring and cutting planks. Depending on the size of your room and the type of flooring you’re installing, this can be tricky. You might also need to make some adjustments for doors and corners.
Measuring and cutting planks correctly ensures a professional-looking finish, so take your time and get it right!
Step 5: Secure the Last Row
Once you have installed most of the planks and have reached the wall where the last row will be laid, you need to secure it correctly. For this, it’s best to measure the space and cut the planks to fit before securing them.
You can use a saw or jigsaw to make the cuts, a hammer, nails, or a nailer to secure them. Ensure all the planks are properly secured before moving on to the next step.
Step 6: Finishing Touches
Now that all the planks have been installed, it’s time to take care of the finishing touches. This includes assessing and addressing any small gaps between the planks and ensuring that all seams are flush and even.
If you find any discrepancies, use a chisel or saw to make adjustments. To keep your engineered wood flooring looking its best, apply a sealer or protective finish to help protect it from wear and tear. With these few simple steps, your new engineered wood flooring will be ready for use in no time!
Step 7: Take Care of Your Floor
Now that your engineered wood flooring is installed, it’s time to start taking care of it. Regular maintenance will keep your floor looking its best for years to come. A few simple steps can make all the difference.
Make sure to sweep and mop regularly with a cleaning solution designed specifically for engineered wood. Review any scuff marks or stains with a soft cloth and the appropriate cleaner. Use a buffer with a specially engineered wood floor cleaner for deeper cleaning every few months.
Finally, keep an eye out for any gaps or loose boards and fix them as soon as possible to avoid further damage to your flooring. With these simple steps, you can ensure your engineered wood floor will look great for years to come!
Step 8: Regularly Sweep and Clean
Now that your engineered wood flooring is installed and looking good, it’s important to keep up with regular maintenance. Regular sweeping is a great way to ensure your floor stays tip-top. Wipe up any spills or liquid residue immediately to protect the floor from moisture damage.
With the right cleaning solution and techniques, you can keep your floor looking as good as new for years to come. With regular maintenance and care, you’ll enjoy the beauty of your engineered wood floor in your bathroom for many years to come.
How to install engineered wood flooring in a bathroom?
Installing engineered wood flooring in a bathroom is a great way to give your space a stylish and modern look that will last for years. With the right tools, instruction, and installation methods, anyone can learn how to install engineered wood flooring in their bathroom.
From trimming the door casings to installing the first row and securing the last row, this guide will walk you through each process step to get the job done quickly and efficiently. You’ll also learn how to take care of your floor by regularly sweeping and cleaning it and tips for repairing and replacing damaged flooring.
Finally, I’ll provide tips on handling humidity, moisture, cuts, and corners when installing engineered wood flooring in your bathroom.
The best ways to clean and maintain engineered wood flooring
To keep the engineered hardwood floor in your bathroom looking like it did when it was first installed, I recommend following a few simple steps. First and foremost, make sure you mop up any spills immediately.
Regular sweeping and cleaning are also important to keep it looking new. You can use a broom or a vacuum cleaner with a soft brush attachment. Make sure to only use cleaning products specifically designed for engineered wood floors, as regular products may damage the finish.
Use a damp mop and a safe cleaning product for your floor for deeper cleaning. If there is any damage to the surface, you can sand it down and refinish it. Finally, be aware of humidity and moisture levels in your bathroom, as they can affect the condition of your flooring over time.
How to repair and replace damaged engineered wood flooring?
When it comes to repairing and replacing damaged engineered wood flooring, there are a few steps you can take to ensure the job is done correctly.
First, you should drill a hole in the part of the engineered hardwood flooring where the chipped piece of wood came from. With a specialized saw blade, you can carefully cut away any remaining pieces of wood.
You can use a putty knife to apply a stain and putty mix to fill any gaps. Finally, use a hammer and nail to secure the new plank. It’s also important to remember that solid wood floors are installed in a tongue and groove fitting method, so removing one plank can be difficult.
How do you handle cuts and corners when installing engineered wood flooring?
When installing engineered wood flooring, cuts and corners can be tricky. That’s why taking your time and ensuring everything is done correctly is important. To start, you’ll need to measure the area and trim the door casings, so the planks fit correctly.
Once this is done, you can begin installing the first row of engineered wood flooring, securing it with either secret nails or screws. As you move along, measure and cut each plank accordingly so that it fits snugly into each corner.
This will help ensure that your floor looks great and is securely in place. With patience and a steady hand, you’ll be able to create a beautiful floor in no time!
How to install engineered wood flooring over radiant heat?
Installing engineered wood flooring over radiant heat can be tricky, but it can be done with the right guidance. To start, you should always check your manufacturer’s instructions for installing engineered wood flooring over a radiant heat system.
Be sure to follow all guidelines and recommendations for the best results. In addition, it’s important to prep the engineered wood planks and the subfloor before beginning installation. This will help ensure that your flooring is properly secured and will last many years.
Finally, an engineered underlay can add an extra layer of insulation and protection, ensuring your floor stays warm and comfortable all winter. With this advice in mind, you’ll be able to install an engineered wood floor over radiant heat confidently.
How to handle humidity and moisture in a bathroom with engineered wood flooring?
When installing engineered wood flooring in a bathroom, one of the key factors to consider is moisture. As bathrooms are naturally more humid than other rooms, it’s important to protect your floor from moisture damage.
Before installation, ensure that your contractor takes moisture content and relative humidity measurements to check for potential problems. Additionally, use appropriate sealants and coatings to protect the flooring.
You should also regularly sweep and clean the floor and use mats and rugs in high-traffic areas. If moisture does start to accumulate, use a dehumidifier to dry out the area before it causes lasting damage.
Summary
Installing and caring for your engineered wood flooring in the bathroom can seem daunting. Still, with the right preparation, attention to detail, and regular maintenance, it can be a rewarding experience. You are following our step-by-step guide and tips on installing and maintaining your engineered wood flooring will ensure that you can enjoy your beautiful new floors for years to come.

